Back to: ELECTRONICS

Imagine you’re embarking on an exciting journey into electronics, and circuit diagrams are your maps. They guide you through the intricate world of circuits, showing how to connect various components to create functional electronic systems. For beginners and young enthusiasts, understanding these diagrams is a key skill. Here’s a straightforward guide to help you get started with reading and using circuit diagrams.
What is a Circuit Diagram?
The Basics
A circuit diagram, also known as a schematic diagram, is a visual representation of an electrical circuit. It uses symbols to depict electronic components and lines to show how these components are connected. Think of it like a recipe—just as a recipe guides you to prepare a dish, a circuit diagram guides you in building an electronic circuit.
Why It Matters
Understanding circuit diagrams helps you:
- Build Circuits: Follow the diagram to assemble the circuit accurately.
- Troubleshoot Issues: Diagnose and fix problems in your circuits.
- Learn Concepts: Understand how different components work together.
Common Symbols in Circuit Diagrams
Basic Symbols
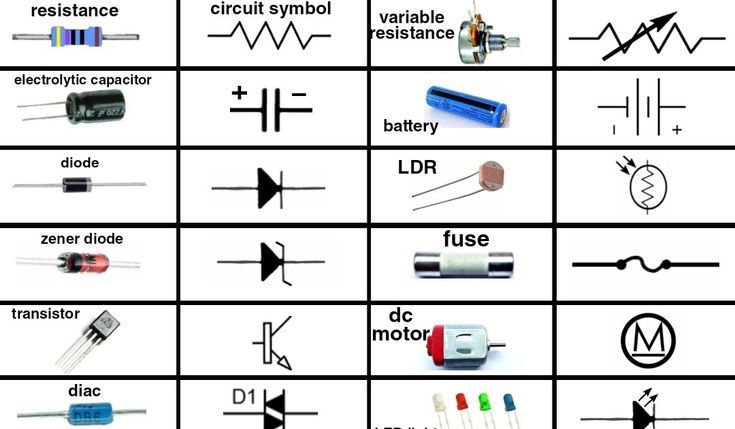
- Resistor: Depicted as a zigzag line or a rectangle. It limits the flow of electrical current and controls voltage in the circuit.
- Capacitor: Shown as two parallel lines. It stores electrical energy temporarily and can smooth out electrical signals.
- Battery: Represented by a pair of long and short parallel lines. It provides the electrical energy needed to power the circuit.
- Switch: Illustrated as a break in a line with a movable part. It opens or closes the circuit to control the flow of current.

Photo credit: pinterest.com
Connections
- Wires: Represented by straight lines connecting symbols. They show how different components are electrically linked.
- Junctions: A dot where lines intersect indicates that the wires are connected. If lines cross without a dot, they are not connected.
[image: circuit schematic with the three types of junction- 2 types of junction and no junction]
How to Read a Circuit Diagram
Start with the Power Source
- Identify the Power Source: Locate the battery or power supply symbol. This is where the circuit gets its energy.
- Trace the Current Flow: Follow the path from the power source through the circuit. Understanding how current flows helps you see how the circuit works.
[image: circuit schematic with the above highlighted, power in red and anode in green]
Understand Component Placement
- Find Components: Look at each symbol and match it with the physical component it represents. For instance, a zigzag line represents a resistor.
- Read Component Values: Some components have values written next to them, such as “10kΩ” for a resistor, indicating its resistance.
Follow the Connections
- Trace Connections: Use the lines to see how components are connected. This helps you understand how each part of the circuit is linked and how current will travel.
Using Circuit Diagrams to Build Projects
Gather Your Components
- List of Parts: Make a list of all components needed based on the diagram. This ensures you have everything ready before you start building.
- Verify Values: Check that your components match the values specified in the diagram. For example, use a 10kΩ resistor if the diagram indicates it.
Assemble the Circuit
- Breadboard or PCB: You can use a breadboard for testing and prototyping or a printed circuit board (PCB) for permanent projects.
- Follow the Diagram: Place components on the breadboard or PCB according to the diagram. Connect them using wires as shown.
Test and Troubleshoot
- Power On: After assembly, connect the power source and test your circuit to ensure it functions as intended.
- Debug: If the circuit doesn’t work, refer back to the diagram to check for connection errors or misplaced components.
So…
Learning to read and use circuit diagrams is an essential skill in electronics. By understanding the symbols, connections, and flow of current, you can build and troubleshoot circuits effectively. Think of circuit diagrams as your roadmap to creating and exploring electronic projects. With practice and experimentation, you’ll become more comfortable and skilled at using these blueprints to bring your electronic ideas to life. Enjoy your journey into electronics and happy building!
