What it does:
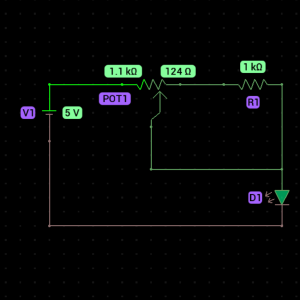
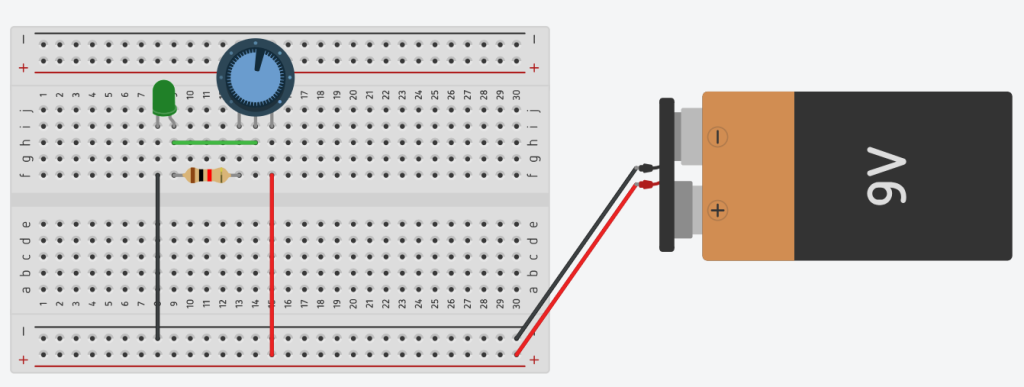
This circuit allows you to adjust the brightness of an LED by turning a potentiometer.

Components Needed:
- Green LED (1)
- Potentiometer (1k) (1)
- 1kΩ Resistor (1)
- Battery (1)
- Breadboard (1)
- Jumper Wires
Step-by-Step Instructions:
- Place the LED on the breadboard (long leg = anode, short leg = cathode).
- Connect the anode of the LED to one end of the 1kΩ resistor.
- Place the potentiometer on the breadboard.
- Connect one end of the potentiometer to the other end of the resistor.
- Connect the wiper (middle terminal) of the potentiometer to the anode of the LED.
- Connect the cathode of the LED to the negative terminal of the battery.
- Connect one side terminal of the potentiometer to the positive terminal of the battery.
- Turn the potentiometer to adjust the LED’s brightness.

How It Works:
- The potentiometer acts as a variable resistor. When you adjust it, you change the amount of resistance in the circuit, which controls how much current flows to the LED.
- When the potentiometer is set to a low resistance, more current flows through the LED, making it bright.
- When the potentiometer is set to a high resistance, less current flows through the LED, making it dim.
- The 1kΩ resistor limits the current to a safe level for the LED, preventing it from burning out.
- By turning the potentiometer, you are adjusting the current flow, allowing you to dim or brighten the LED.
