What it does:
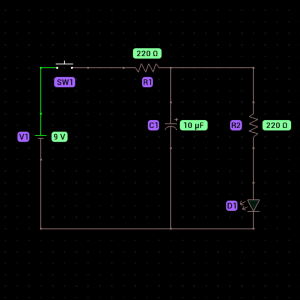
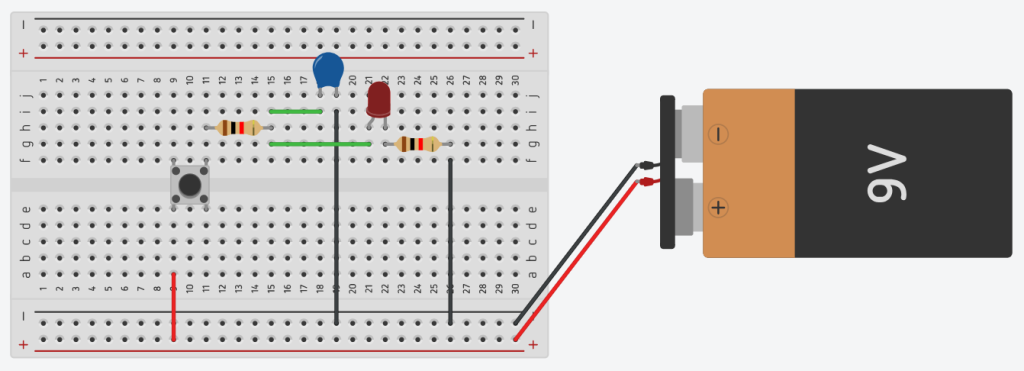
This circuit makes an LED gradually fade on and off. The fading effect is achieved by charging and discharging a capacitor, which controls the current flowing through the LED.

Components Needed:
- Green LED (1)
- Capacitor (10µF) (1)
- 1kΩ Resistor (2)
- Battery (1)
- Breadboard (1)
- Jumper Wires
Step-by-Step Instructions:
Place the LED on the Breadboard:
- Insert the LED into the breadboard. The long leg (anode) is the positive side, and the short leg (cathode) is the negative side.
- Connect the Resistors:
- Attach one 1kΩ resistor to the anode of the LED.
- Place the second 1kΩ resistor on the breadboard and connect it to the other side of the first resistor in series.
- Add the Capacitor:
- Connect the capacitor across the second resistor and the cathode of the LED. Ensure the capacitor’s polarity is correct: the longer leg (positive) should connect to the resistor, and the shorter leg (negative) to the LED’s cathode.
- Connect the Battery:
- Use a jumper wire to connect the positive terminal of the battery to the free end of the first resistor.
- Connect the negative terminal of the battery to the cathode of the LED using a jumper wire.
- Test the Circuit:
- Once connected, the LED will gradually light up as the capacitor charges and gradually dim as the capacitor discharges. This creates the fading effect.

How It Works:
- When the circuit is powered, current flows through the resistors and starts charging the capacitor. As the capacitor charges, the voltage across it increases, slowly powering the LED and making it gradually brighten.
- When the capacitor is fully charged, it begins to discharge through the circuit. This reduces the current flow to the LED, causing it to dim slowly.
- The cycle repeats, creating the fading on-and-off effect.
- The resistors control the charging and discharging speed of the capacitor, ensuring a smooth fading transition.
